What is an aperture?

Hello fellow Photographers,

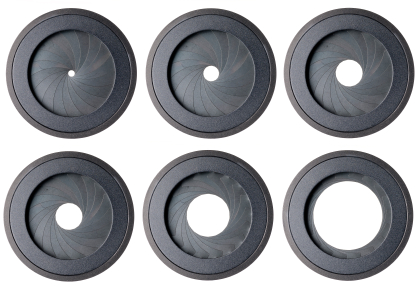
I always used to wonder when i started Photography as in what is an "Aperture", the dictionary meaning is "an opening, hole or a gap". So this exactly what it does, the amount of light falling on to your sensor. Once you understand how does the light affects the image then everything becomes very simple. If you look at the following image it shows you what exactly aperture is your lens.


Now why I am saying that aperture plays an important role, to get a right picture we need right amount of light and for that we need to understand exact amount of f-stop. Aperture not only controls light but also gives a depth of field, as in, making the background in focus or making it completely blurred. You can make it out from the following images.
Shallow depth of field

F: 6.3
S: 1/80
ISO: 100

F: 3.5
S: 1/400
ISO: 100


F: 1.8
S: 1/1000
ISO: 100


More the f-stop shallow the depth of field and less light, and less the f-stop more the depth of field and more light.

So now you have the theory part of it but the most important is how and where to use the f-stop. Now it all depends on the situation, light and type of photograph. Usually if you want capture a beauty of nature at day time then usually f-stop should be around 8 to 9 (provided your camera is on aperture priority as the shutter would be automatically set). As you know more the f-stop more things are in focus and less the light.

Now say if you want to shoot a group of people standing, then again the same f-stop would work, as we need everyone to be in focus, but also it varies from the amount of light you have, else u will end up in camera shake and screw up the photo.

For the above situation you can reduce the aperture and let people stand in such a way that they are in a line next to each other. So this can get u enough light and reduce the risk of camera shake.
I will write more on candid photoshoot and how to control more on aperture/f-stop.
You may visit http://rohanshetti.blogspot.com for more information about aperture, he is one of the best nature photographer I know.

1 comments:

No wide angle lens ? No worries

Hey Fellow Photographers,

Everyone loves nature/landscape photography, which many times includes old objects, huge buildings etc, but most of the times its always good to shoot by wide angle lens, however its not possible to buy a $1000+ lens for few shots, especially if your subjects are human.

So I have a easy solution to overcome this problem, and get a nice wide angle photograph & you may see the results as follows:


Trust me this is shot by normal 18-55mm is canon lens, with Canon 1100D camera. I wont comment on the technical aspects of the shot but, just to show how we can get a complete wide angle from a normal 18-55mm kit lens.

So let see how this is actually possible and how to shoot.

When you look at the subject you can guess if you require a wide shot, or just normal lens would do the job. Now you need to decide how to where do you want to start from, like from the above picture is captured from standing in the center of the building.

First thing you need the right exposure and aperture for the shot, so switch to "Aperture Priority" mode and set your F-stop to 8 - 9 depending on the light as we need almost everything in focus (Shallow depth of field) . Remember to keep your ISO 100 or less if you can. Then focus on to the center and record the settings.

f-stop : 8
Shutter : 1/60 (May change according to light)
ISO : 100

Now the settings are recorded, then switch to Manual mode and replace the settings with the new ones, as we need same light in all the images that we are going to click.

*Now the most important part, the trick is we will click a panoramic shot but in a portrait mode (vertical position)


Also you do not need any trypod or mono pod for this shot. So the tric is you just click photos from right to left with one image overlapping another like follows:


Now as you can see how did i shot. So in similar way you need to shoot, as you could complete the picture just by looking at it .

Now the last and final step, which you all are waiting for , merging all the images. Its very simple just open all of them in photoshop, also do not forget to edit all the photos with the same settings else when you merge it it wont look good as it should be.

Now Open all Images at once in photoshop,  and click File -> Automate -> Photomerge.

Select Add Open Files & keep the layout Auto, it works most of the times. Sit back and relax and just crop the photo and save it.


That what it is, just a matter of time and you get a nice wide angle shot. 


Leave comments for more details.

2 comments: